


Log in
Latest topics
Who is online?
In total there are 11 users online :: 0 Registered, 0 Hidden and 11 Guests None
Most users ever online was 306 on Fri Sep 17, 2021 9:36 pm
Top posting users this week
| No user |

❤εтεяиal ғαѕнiσи❤- тнε сlυв
+3
Britney
Katie♔
Michelle
7 posters
Page 2 of 2
Page 2 of 2 •  1, 2
1, 2
Re: ❤εтεяиal ғαѕнiσи❤- тнε сlυв
![]() by Katie♔ Mon Jan 14, 2013 9:50 am
by Katie♔ Mon Jan 14, 2013 9:50 am
MORE! I really want toms now, like a sparkly pair or crochet ones c:

Katie♔- Admin

- Posts : 3188
BearCoins : 5164
Join date : 2012-07-21
Location : Viva Las Vegas! -

Re: ❤εтεяиal ғαѕнiσи❤- тнε сlυв
![]() by Michelle Mon Jan 14, 2013 9:51 am
by Michelle Mon Jan 14, 2013 9:51 am
Omg no! I could join now if u want, ill join (:

Michelle- The Bearville Mascot
- Posts : 3145
BearCoins : 1
Join date : 2012-07-31
Re: ❤εтεяиal ғαѕнiσи❤- тнε сlυв
![]() by Michelle Mon Jan 14, 2013 9:51 am
by Michelle Mon Jan 14, 2013 9:51 am
lol ive been wanting a pair like that too(:KɑtieBuɢ♔ wrote:MORE! I really want toms now, like a sparkly pair or crochet ones c:
Michelle- The Bearville Mascot
- Posts : 3145
BearCoins : 1
Join date : 2012-07-31
Re: ❤εтεяиal ғαѕнiσи❤- тнε сlυв
![]() by Michelle Mon Jan 14, 2013 10:07 am
by Michelle Mon Jan 14, 2013 10:07 am


whats forever 21
Forever 21 is an American chain of clothing retailers with branches in major cities in the Americas, Europe, Asia,Canada and the Middle East that offers trendy clothing and accessories for young women, men, and girls at low, affordable prices.
Would i recommend buying from Forever 21
I think the quality at F21 is pretty good. have never had an issue with their clothing as far as the quality is concerned! As long as you take care of the clothing when you are washing it, you should be good to go!! I would say that the quality of clothing is quite similar to items that you would purchase from Rare Fashion, if you are familiar with that UK brand, especially their Paprika line, if that gives you an idea from a store that is around you. Because you are a size UK10 or US6, I would recommend going with a small or possibly a medium. They do list measurements on the site as well and several pictures for you to get an idea of what the garment will look like!
I would suggest purchasing leggings from F21, as they have so many great styles available. The jewelry is very fun and I LOVE their dresses!!!
Hope that helps!! I think you will be pleased overall with their selection and pricing! You will get a great exchange rate at this time so shop on girls!
Last edited by Taylor Swift on Mon Jan 14, 2013 11:11 am; edited 1 time in total
Michelle- The Bearville Mascot
- Posts : 3145
BearCoins : 1
Join date : 2012-07-31
Re: ❤εтεяиal ғαѕнiσи❤- тнε сlυв
![]() by Michelle Mon Jan 14, 2013 11:04 am
by Michelle Mon Jan 14, 2013 11:04 am
UPDATED THE FIRST POST ON THE FIRST PAGE. Srry for double posting
Michelle- The Bearville Mascot
- Posts : 3145
BearCoins : 1
Join date : 2012-07-31
Re: ❤εтεяиal ғαѕнiσи❤- тнε сlυв
![]() by Katie♔ Mon Jan 14, 2013 11:10 am
by Katie♔ Mon Jan 14, 2013 11:10 am
I love the forever 21 and the toms one!
Katie♔- Admin
- Posts : 3188
BearCoins : 5164
Join date : 2012-07-21
Location : Viva Las Vegas! -
Bella♪- Royal bear
- Posts : 823
BearCoins : 6
Join date : 2013-01-13
Re: ❤εтεяиal ғαѕнiσи❤- тнε сlυв
![]() by Michelle Sun Feb 10, 2013 4:59 am
by Michelle Sun Feb 10, 2013 4:59 am
sorry i havent posted in a while, but im going to post right now (:
Topic: Gradient Nails
a lot of you might not know how to make them but im happy to show a tutorial on how to make gradient nails that i got from a website so its not originally mine.


Tutorial:
The Stuff...
Two colour polishes and a top coat
You can choose colours that compliment or go bold and pick two that clash. Experiment with different combinations and see what works.
A sponge, a plastic sheet and toothpicks
I bought a big bathroom sponge and I just cut sections off when I need them. The sections don't have to be perfectly cut, as long as one side is flat it will work. You can use absolutely any sponge - a make-up sponge, washing up sponge or any other kind of sponge you can find.
If you don't have any of these plastic wallets in the house, raid the kitchen cupboards for some foil or baking paper.
The Fun Part...
Step 1
Using the lightest of the two colours, paint your nails and wait for it to dry completely.
Step 2
On a flat surface, paint a generous amount of the colours right next to each other on to the plastic. Make sure they're just about touching at the edges.
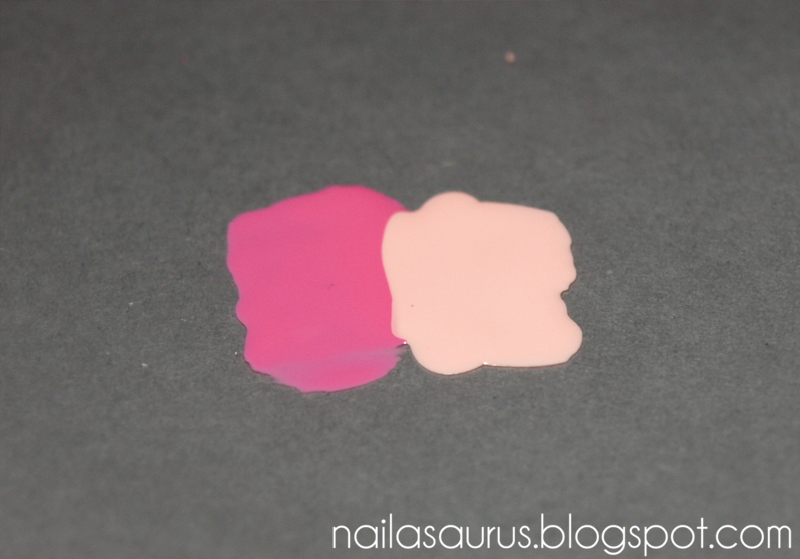
Step 3
Using a toothpick, swirl the two colours together where they meet. The area where they mix will determine the length of the graduation. So if you want a long graduation, mix a bigger section of the colours, if you want less of a fade, just mix them together a tiny bit.

Step 4
Take your sponge and dab it directly down on to the polish a few times.
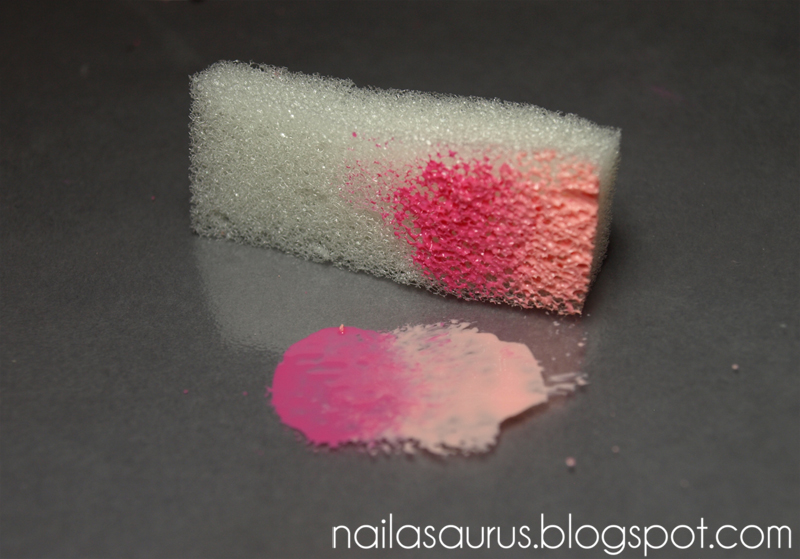
Step 5
Dab the sponge directly down on to your nail. Keep dabbing lightly and moving it very slightly up and down your nail.

Step 6
Add a topcoat. Or two or three! The sponging makes this mani very bumpy so you may need a couple of topcoats just to even out the surface.
Step 7
Clean up all the excess using a brush dipped in acetone or polish remover. I use a q-tip dipped in remover for the big bits I can reach on my skin, then a small brush in pure acetone as I get closer to my nail and to make a crisp line near the cuticles.
ALL FINISHED
Topic: Gradient Nails
a lot of you might not know how to make them but im happy to show a tutorial on how to make gradient nails that i got from a website so its not originally mine.
Tutorial:
The Stuff...
Two colour polishes and a top coat
You can choose colours that compliment or go bold and pick two that clash. Experiment with different combinations and see what works.
A sponge, a plastic sheet and toothpicks
I bought a big bathroom sponge and I just cut sections off when I need them. The sections don't have to be perfectly cut, as long as one side is flat it will work. You can use absolutely any sponge - a make-up sponge, washing up sponge or any other kind of sponge you can find.
If you don't have any of these plastic wallets in the house, raid the kitchen cupboards for some foil or baking paper.
The Fun Part...
Step 1
Using the lightest of the two colours, paint your nails and wait for it to dry completely.
Step 2
On a flat surface, paint a generous amount of the colours right next to each other on to the plastic. Make sure they're just about touching at the edges.
Step 3
Using a toothpick, swirl the two colours together where they meet. The area where they mix will determine the length of the graduation. So if you want a long graduation, mix a bigger section of the colours, if you want less of a fade, just mix them together a tiny bit.
Step 4
Take your sponge and dab it directly down on to the polish a few times.
Step 5
Dab the sponge directly down on to your nail. Keep dabbing lightly and moving it very slightly up and down your nail.
Step 6
Add a topcoat. Or two or three! The sponging makes this mani very bumpy so you may need a couple of topcoats just to even out the surface.
Step 7
Clean up all the excess using a brush dipped in acetone or polish remover. I use a q-tip dipped in remover for the big bits I can reach on my skin, then a small brush in pure acetone as I get closer to my nail and to make a crisp line near the cuticles.
ALL FINISHED
Michelle- The Bearville Mascot
- Posts : 3145
BearCoins : 1
Join date : 2012-07-31
Bella♪- Royal bear
- Posts : 823
BearCoins : 6
Join date : 2013-01-13
Page 2 of 2 • 1, 2
Page 2 of 2
Permissions in this forum:
You cannot reply to topics in this forum|
|
|
» howdy folks
» DING DONG BUDS!
» hello old friends
» If anyone reads this..
» Hi Everyone! Lexi Here c:
» I FOUND A NEW BEARVILLE!
» What's next of Bearville?
» Play.Build a bear